Translate

Sunday, May 7, 2017

DCC, Lights, and cars

 Not too exciting of an update really. No major progress has been done scenically to the layout, but I have acquired some neat new toys.
The biggest of which is an NCE powercab DCC system. I have yet to permanently hook it up to the trackwork, but ultimately I would like to be able to switch between DCC and DC so I can run all my dumb junk in circles for hours! I've been slowly getting more DCC equipped stuff so having a way to run it other than at the club is really nice. I have it a ramshackle set up for now, but I'm having a lot of fun with this thing.
one remote to control them all...

Aside from that I mentioned last post I had put lights in the ship but didn't have any pictures to prove it, so there ya go! Sure does look cool. I cant wait till I have more buildings and scenery in place!

the last train of the day, speeds through Southbend before nightfall

 I also got my mits on some really nice resin vehicles with a retro future sci-fi vibe to them.
there 10mm wargamming scenery pieces from the awesome guys at Hawk Wargames. The vehicles are surprisingly detailed, and being 10mm are roughly N scale. putting them next to other "true to scale" cars and trucks they do seem a tad small, but I think that once they are mixed in with other cars and trucks it will be much less noticeable. Paint would also most likely help

 I ended up with 2 bags of cars, 2 bags of trucks and buses, one post-apocalyptic double-decker bus, and one completely unrelated light cruiser class spacecraft. The picture on the right is a comparison with some actual N scale cars. Well, hover cars, I like to mess around but you get the idea.
Got a few more fleet reviews in the works so expect some new stuff up soonish (whenever I stop being lazy).

Wednesday, March 29, 2017

Some Progress

Updates have been slow, but I have been working on the layout! Its getting to the point where I really need to start looking at buying buildings and scenery. The city deck is, well its gonna take a long time just because the type of buildings I want take a few paychecks to acquire. but the other end, which as of this post I am dubbing 'Southbend' is coming along nicely.

So in the mountain department, the SS Eisenhower Hotel and Casino is done. Like done done. No mas. Is even lighted now using some LED strip lights I swiped Purchased legally at my local car store.

DONE!!(just the boat tho)

Also in is the long awaited trolley station, A Walthers Union Crane and Shovel kit. its painted, weathered and in place where it needs to be. It is not however fixed yet because I need to make sure it is the right height to the EL line, the girder sections of which should be coming in sooner(hopefully) rather than later. After that its plaster cloth and scenery time.

Southbend in all its glory

As you might be able to also tell from the above picture, I've started to plan out some of the roads and were buildings will go. Because of the sub docks taking up much of the scene in Southbend, theres likely going to be less buildings than I originally intended, but I'm hoping that once the trolley line goes in it'll fill up some space and look more dense. I just gotta figure out what I want to be there!
But all in all, its starting to look more layouty...well at least one end is, but that good! Its come a long way from a door I stole from the garbage with pink foam on top!

Its getting there!

Sunday, February 5, 2017

Fleet Review: Atlas 2-6-0 Mogul

Another new addition to my ever growing US Civil War era rolling stock. This big boy(for its time) was made by Atlas and Micro-Ace. I believe the model itself was designed by Micro-Ace and then imported to the states by Atlas, But don't quote me on that!
This particular one I bought unpainted at the same time I bought the C56 for the same price no less. I decided on painting it for the Baltimore Ohio Railroad in freight colors. I took a few liberties with painting as well as naming(a common thing for locos at the time) because even though I wanted to do the B&O, I...well, I didn't like their 'rules' so to speak.
I did some research and found that the B&O was one of the few railroads at the time who followed a uniform paint scheme for passenger and freight locomotives. It was also common for railroads in the early and mid 19th century to name locomotives in a similar manner to ships, but the B&O put an end to that pretty early (around 1850ish) and opted to use numbers because of how many engines they were acquiring. I decided that it needed a name anyways, and I changed up the tender lettering a bit too. Because oh well...

 I decided to name it 'Firefly'

As far as running goes, its actually quite amazing given the whole size of the thing. For pickup its got 4 of the drivers pulling power, the rear set being equipped with traction tires and being geared. The tender also provides pickup from all 4 axles and has a nice heft to it to keep contact with the rails. For power we have a teeny tiny 5 pole motor squeezed into the cab, so unlike other smaller engines (most notably the bachmann 4-4-0) there is no driveshaft coming out of the tender.
There also is a working directional headlight with is pretty amazing that Micro-Ace/Atlas managed to fit that stupid thing in there. Its not very bright but hey, its there! Also, a thing to note, the tender boogies are actually fixed into place. Don't be alarmed as the tender is so short, that this causes no problems taking turns and the engine will happily make a 9.75 radius curve. This is also actually something even the the prototype had believe it or not!

 sexy rear shot! $5 if you can guess what kind of coupler that is

Out of the box it comes equipped with a pretty standard MT knuckle, but I swapped that out for something else.
One thing to note though, is that this engine, just like the C56 needed to be drowned in oil to get it to work smooth. It was very dry and ran like poop as a result of that. So if you ever get one make sure you lube literally everything that moves. It will increase performance by 100%. This makes 2/2 Micro-Ace locos that came un-oiled so it may be a thing with them, but I'm not certain for sure yet.

Back to the couplers, Micro Trains makes a lot of CWE(civil war era) stuff and as such offers link and pin type couplers for older era trains. Since I started to grow my CWE fleet I though I would try them out. They couple very close and actually look pretty good. almost unnoticeable unless you point them out. they kinda snap into the supplied coupler boxes where you fit a little pin into a hole. though you can get away without using the pin, it actually expands the thin plastic that the link snaps to and creates a stronger hold. pretty reliable and since they don't easily come apart, they make derailments pretty interesting! 

 Not too bad...

The picture to the left is what they actually look like out of the box. from left to right: the draft box, the link itself, and the pins. the picture above is how it all goes together. Only thing I don't like about them is that they are very unforgiving of up and down movement, and I discovered that some of my cars are actually slightly too high and physically lifted the Moguls tender off the track making pickup an issue. But over all not bad and a neat accessory for older era stock. Though on a side note, I bet it could work really well with some European stuff too. Would definitely look better than those boxy rapidos!

So yea, I really like this thing a lot. And once you lube it up it runs near flawless. I would love to get more but they are kinda rare, but for those of you who model CWE railroads in N scale this thing is a definite to add some heavy freight to your roster!

From front to back: 2-6-0 'Firefly', 4-4-0 'William Mason', 4-4-0 'Alas', 4-4-0 CP 'Jupiter'

Tuesday, November 22, 2016

Fleet Review: Bachmann MDT Plymouth Industrial


The first versions of this little industrial critter were released by Bachmann way back in the 70's. There have apparently been at least 3 other versions of it since then, but this one is a gen 4 if you will, the latest 2015 release. Cant say much on the other versions since I ain't got em.

 The packaging is quite attractive...even if the locomotive isnt!


I picked this little guy up at my LHS. Was an impulse buy really, thought it was an ugly little bugger and decided I needed right then a switcher for my layout. I honestly wasn't expecting much from it. It was cheap as dirt ($32.00), wasn't a particularly pretty loco, and it was a Bachmann(QC could very likely be off). but hell, it was yellow, and I like yellow! 


 this picture actually turned our pretty ok

Turns out, she was an ugly little gem of an engine. Popping the shell off is an easy affair, and reveals a pretty standard split metal chassis. The motor is some kind of can(can't count the poles) hidden in the 'cab' section and drives a worm gear on a short little axle. All 6 wheels are geared and all six pick up juice from the track. oh, and there's a non-directional headlight in there too. Just a standard grain of wheat bulb, no led.

 'with the outer shell removed, the soft innards are exposed to waiting predators...'

There were two surprises with this thing, one: it came with magnetic knuckles. The Bachmann variety I believe(I am not an expert on N scale knuckles), and two: it runs really well! The heft of the all metal chassis plus the all wheel pickup probably helps this thing to keep contact and push through even uninsulated switches. not to mention that the slow speed creep on this baby is not bad at all.
Now I've found that while it does run well, if you don't mess with it for a bit it will need a bit of 'warming up' before it starts to run smoothly. I run this thing for hours at my club running on a mine with a reversing switch, and have had no problems so far with it.
So sure, its not pretty, and its a Bachmann, but its respectable, good even. perhaps a bit of weathering would help it look a little more, gooderer...but that's just a nit pick. If your ever in a bind for a cheap switcher, check this guy out.

pose for the camera

Wednesday, November 16, 2016

Mountian Momma


Progress on the mountain is, well, progressing. Albeit slowly. I have been working on the ship to get it ready for mounting. so I can call this dumb mountain done and go do something else.
So I started by stripping the paint and priming it with krylon gray primer, then drilled out the portholes(which took forever). masking and painting the hull and super structure was pretty straight forward.

Front boat is done, butt boat still needs work

I also stopped at the Great Scale Train Show in Timonum MD and picked up a little laser cut shed from Northeastern Scale Models Inc. The Purpose for this little shed is going to be a substation that will provide power to the 2 halves of the ship via "power" lines that connect to the masts on either end. The building is finished, as well as a little power pole that I scratch built using some spare bits I had just plotzing around.

 its a substation!


All that's left to do is slap on some paint and its good to go. Connecting up the power lines should be a piece of cake.
And speaking of power lines, here is a close up of what I have been dubbing "front boat" with all the rigging finished. Still needs a touch of weathering, but I'll do that once I get the other end(butt boat) done

Still not sure how it got in the mountain in the first place...


Here is the mountain in all its glory, I cleaned up the area around it a bit, but I think the next thing I'm going to work on is the sub dock. But we shall see, still a lot to do for the hotel and mountain. 
stay tuned!

Thursday, September 29, 2016

Mountain building cont.


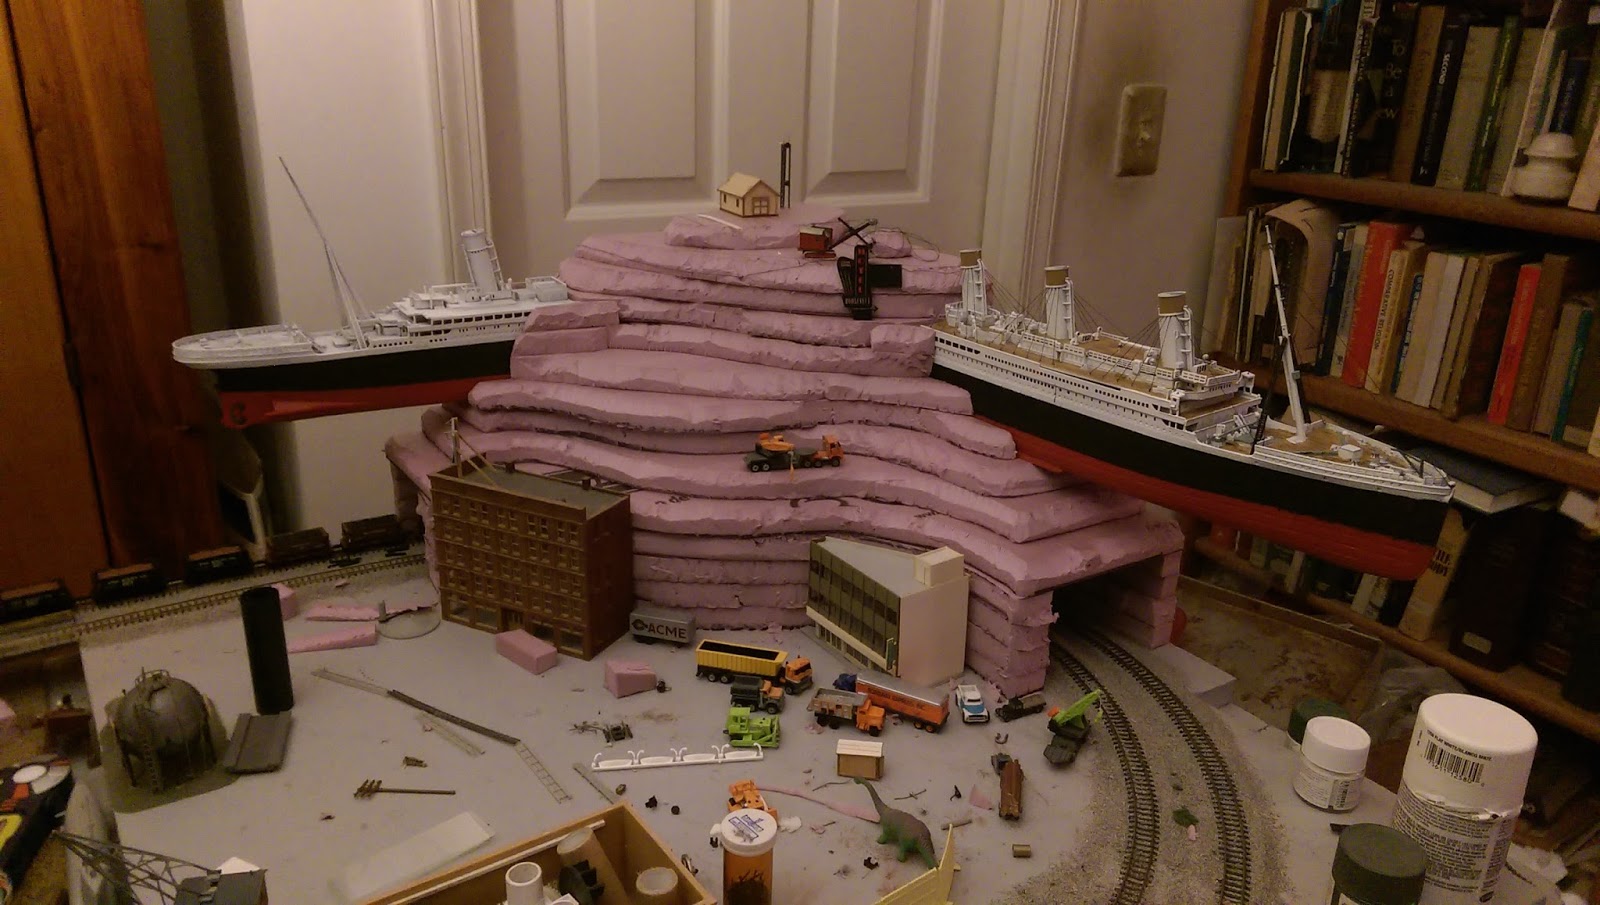
Well, Its coming along. I've decided to use an old model of the Titanic I got from a friend a while ago. was never really gonna finish the half built thing, but this I think is a better idea then just tossing it. I'm thinking a mountain top resort, or casino? I'm not to sure yet, but I am planing on drilling out the portholes and adding lights and signage eventually

T
It even came with a bow!

The ship was missing a lot of parts and was basically just the hull glued together and painted. It  seemed that this was a decent route to take. I couldn't think of anything else to do with it. (On a side note, I calculated the length of the Titanic in N scale, and it would come out to a nicely reasonable 8ish feet!)
But anyways, I put together what I could with the parts I had and got to chopping this puppy in half. If I'm gonna put a ship in a mountain, might as well see both ends right?

 Its a start right?

Cutting was a pain, I initially started with my dremel and a cutting head, but realize that even with the outer parts of the hull cut, there still were decks holding it together(shoulda realized the first time!).
I ended up using a little jewelers saw to cut it the rest of the way. Wasn't pretty, but, since the cut ends are gonna be hidden, it don't matter none.

 bet you've never seen a mountian like that before!

I stared to layer up the foam around the ship, using the piece before as a template for the next. I mentioned in a prior installment that I wanted an elevated trolley line to go from the city deck to the other end of the layout, but didn't really have a plan. Well now, I've got a plan, and the EL line is gonna end here, as a small(but exclusive) trolley line that will soon service the casino/hotel/resort.

 now I just gotta figure out the middle...

This last picture is a view of the whole thing(well most of it at least). I just dry fit all the funnels and masts to the ship to see what it will look like, and so far, I''m liking it. I'm thinking that the rigging would lead to a small electrical substation with a big ole' sign on the top of the mountain. but first I need to finish the ship, carve the mountain so its nice and smooth, and then toss on the plaster cloth.
theirs still a bunch to do!

Friday, September 23, 2016

Back at it


Eh, its been a while, been dealing with a lot of personal stuff lately that kept trains out of the picture for a bit, but things are slowly going back to normal, so I've decided to get back in the game.
I've had an idea floating around in my head for a while now, but I couldn't really figure out the best way to go about doing it. At first I thought it would be cool to build an N-trak module but I've since found a way to incorporate it into my own layout. I am of course talking about a big ole mountain. who doesn't want a nice mountain on their layout with trains running through it? I do, so the first step of course is cleaning the table.
 It was harder than it looks

I decided that it was best to make the mountain cover only a quarter of the curve, I was thinking at first to do the entire turnaround but thought that between the city deck and the soon to be mountain, the trains would spend too much time being covered, and were all here to see the trains so that would be lame.

that looks like a mountain right?

After some rightfully painful thinking(it hurts to use my brain that much sometimes) I decided to try my hand with foam. Hell, the layout is mostly foam so far, so why not? having never made a mountain before, I'm kinda doing this as I go. been using Elmer's glue to put it all together. should be using my adhesive caulk, but I'm lazy and this actually seems to be working quite well so far. We will have to wait and see if it holds together once theirs more mountain up. Hoping it wont collapse!

Oh! and I've got a new toy!! Very excited about this beastie!

CHOO CHOO MOTHERFLUFFER