Translate

Wednesday, October 9, 2019


Work has been plugging along since my last update, its certainly been a while, but all hope isn't lost!
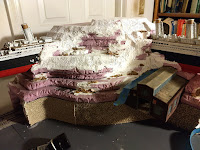
The mountain is pretty much done now. I've tossed on some grass, a pinch of rubble and a smidge of shrubbery.
Its not looking too shabby for a first try honestly. Its not perfect but its definitely passable. still bits to touch up here and there, maybe a little more highlighting on the rock face? who knows!
I've started to plot sidewalks as well, in fact one section is already done and down! I really didn't want to drop all that cash on pre-made sidewalks (they do look good though) so after a lot, and I do mean a lot of experimenting and googling, I came up with the idea of using cereal box cardboard cut, scored, painted and weathered for a foundation/sidewalk combo. Took a few tries, but I think I did pretty ok.

With, and without buildings. I though cutting and scoring all those lines would be way harder than it was

You can see in the pictures above how it turned out. still debating on if I went a little too hard on the weathering, but with the buildings down its not awful. there is a section directly below the trolley station that needs weathering. I didn't account for it, but there's no building there to cover up the non weathered section and is just open concrete for now. I'll think of something to put there but it looks out of place with the sidewalk weathered next to the bare foundation bit.


You can see the bare spot directly ahead under the EL. Definitely looks a little weird


 An uptown view of downtown

In laying out sidewalks, I somewhat have a boundary for the sub port now. the outside will be lined with chain link fence to show the boundaries. I still need some buildings, so other than that section that's already down, Its all still being tossed around  a little bit, but its definitely much more final now. Even just like this Its looking pretty great! I'm already dreading having to work on the main city...its getting closer!

 the current state of Southbend

 That's most of it for this post. I'm going to the train show a the end of the month so hopefully I can get bunch of stuff I need to keep going, and get some much needed Inspiration and motivation to kick start some more construction!
Also, bonus, I weathered the railship! The camera really brought out the rust, but its much more dulled in regular light. I'm eventually going to put some gantry and scaffolding around the area its parked in to make it look like a dry dock or service bay or something. but I gotta finish painting the warehouse building.

 In for repairs

Tuesday, January 8, 2019

Fleet Review: BLI E8A

Another Loco from Broadway Limited, this time something a little smaller.
The EMD E8A, along with some other E series locomotives were produced around 1945 to about 1949. and were synonymous with the late 40s, early 50s streamliners. Most famously they pulled the likes of the Santa Fe "Super Chief", Great Northern's "Empire Builder", and even our lovely model train manufacturers namesake, the Pennsylvania Railroads "Broadway Limited". BLI does a good job in keeping up with the sleek art-deco lines of the original locomotive and its robust sound set definitely turns heads.

Definitely not the best place to flip this thing upside down

The loco I have here is the second run model produced in 2014 with Broadway Limited's new Paragon 2 sound decoder. The decoder itself is essentially the same as the one offered in the centipede but is equipped with different engine and idle sounds.
The sound comes from a single speaker, but its definitely loud enough to contend with some (not all) HO sound. Like the centipede it has 3 horns to choose from which can also, with proper set up be quilled. It of course sounds a little weird on a diesel horn, but should theoretically sound awesome on a steam engine.
Under the hood of course is the expected 5 pole motor, and with the sound muted, runs both smoothly and quietly. The drive shafts are also equipped with a pair of flywheels to assist in smooth starts stops.

 The money shot
On to detailing, The most important part! 
If theirs one thing Broadway is consistently good at, its making things look good. The model it self absolutely gorgeous. The separately applied grab irons look awesome, the paint is sharp and vibrant, and most interesting is that this engine, unlike any E unit I have or have seen, actually has a functional rear diaphragm. I've never seen anything like that before, but its certainly a nice touch (I mean it, its fun to play with).

You cant tell from the photo, but trust me, the diaphragm totally works

But as nice as this engine is, and I certainly do like it. Its become one of my most run engines. There are a few things of note that I have some quibbles with.
First and most importantly is pickup, specifically around switches. I'm not sure if this is limited to just mine or all E8's as I only have 1, but like the centipede, this thing struggles on code 55 track. I'm not sure why, as I've gauged all the wheels and consistently clean them, but this thing stalls on nearly every switch where other DCC engines do not. It runs great on code 80 track, switches and all, so I'm not sure what the issue is here.
also to note, I have the CB&Q version, as that is slowly becoming my railroad of choice, but while the paint is definitely amazing in all respects, its just ever so slightly a different shade of silver than the Kato made CB&Q units I have. It almost has a goldish hue to it when in the right light. I know its 2 different companies, but if something like that is important for, like, Uniformity reasons, it might be of some note.
But in all I do rather like this engine, and would like to get a matching B unit for it ,which I don't think BLI makes for the CB&Q. But if your in the market for some really sharp looking DCC streamliners I would recommend looking at one of these as a DCC sound ready option. Just make sure you register that engine so you have an active warranty. You know, just in case...

"this is New Port station to 9916, you are go for green"

Tuesday, August 28, 2018

A layer of plaster and a dab of color

There's always a long pause between updates, but things have been happening, albeit slowly. Mainly on the South Bend section of the layout as that is the closet to being a layout. I've moved forward with mountain building, and finally got the courage to attempt to carve the foam and lay down some of that sweet plaster cloth I bought last year. With the help of a tub of wall spackle, this is the ending result:

                        
 Looks kinda sloppy, but its my first time doing this so I'll take it

Definitely wasn't feeling confident in it once I had finished and it had all dried, but after slapping on some color, it actually doesn't look too bad. at least for a first go. I got some plaster goo on the ship, but hey, nothing a spot of paint cant hide. I also got some retaining walls from a company called Chooch Enterprises. Its a rubbery silicone sheet thing with a self adhesive back that you can slap on where needed. I didn't trust the glue it came with so I spread on some of my trusty adhesive caulk and we were in business. I needed 2 sheets, but I bought 2 different styles by accident, and left an ugly looking seam between them, but since a building is going to be directly in front of that part I'm not too worried.
The next step is to get some ground cover down. I'm thinking kinda shrubby and gravely like a cutting or cliff since to me it looks more like a little piece of a larger mountain. So I'm gonna go light on the trees, heavy of the scrub and see what that looks like.
Its slowly coming together now, and the more I do the more excited I get. I cant wait to start taking some nice scenic pictures!

looking more and more erry day!

Monday, April 23, 2018

Its all coming together

The plastic sheet has been cut and painted, and boy does it look nice to have something resembling roads! I just used a random can of grey primer I found in my paint pile and used it just to get something down, but I'm actually really liking that color. I think I may just seal that and  go with it.

 starting to actually look like something for once...

I also made a tunnel portal out of the leftover parts of a bridge and cut them to fit in the mouth of the tunnel. I was having a real problem getting a tunnel portal that fit.
When I initially laid the track, I didn't measure the distance between the rails good enough, and as a result the tunnel mouth ended up way to wide. Visually it doesn't look too bad, but getting a standard tunnel portal to fit in there was pretty much impossible, so I had to bash something up. Doesn't look amazing, but I think once its painted it'll do.

the mountain grew a bit it seems. Cant wait to start planting trees!

I also added a bit more to the mountain. Helps the thing look more like it belongs and isn't just a random large hill. So now there's some more rocks to look at and makes it slightly more believable. Last but not least, the ship/s are finally glued in. which makes the mountain a permanent feature. all that's left now is to wrap that bad boy in plaster cloth and dress her up!

Stay Tuned!

Sunday, February 25, 2018

Roads and Zoning

Well, its been a while, but I've finally got a bunch of the materials I need to continue on. Most notably the elevated track sections. A friend gifted me a set of Chicago style EL sections from the lovely people at Imagine That Laser Art. Their kits (of which they have many) are all laser cut plywood and the detail on them is top notch! Having built some laser cut junk before these went together with fairly little problem, though you do have to be careful with the N scale version of them to make sure everything lines up right. 
But any who, I got the first section done which allowed me to finalize the proper height for the trolley station into the mountain, which also allowed me to finally start gluing the the dang thing together!

 The first section coming together. Words of wisdom though, computers aren't good workbenches. 

In this next picture, the actual elevated section is complete and I'm lining up the height of the station with the deck of the platform. The next step is to permanently glue the station into the forming rock face. That long white sheet is actually a hunk of sheet plastic. the plan is to use that as the road base and build up the sidewalks with cardboard. It sounds silly, but I've seen it done else were so Imma give it a try!

I CAN FINALLY GLUE THIS THING TOGETHER


This is a stencil I created of the area in the picture above. A full Map of the road/ground. I'll transfer the shape to that plastic sheet and spray it road color. Hopefully I got the shape right because that plastic sheet ain't cheap!


Look at that EL track though! Isn't it awesome? 
But hopefuly I can really start to ramp building up now that I have all the things I need to actually move forward. Which is great, because I'm tired of looking at boring spray painted foam! 

 Ding Ding! next stop, more updates!


Saturday, June 17, 2017

Fleet Review: BLI Baldwin Centipede

This review is way past due, partly because of my laziness, and partly because of an issue involving the locomotives themselves. But more on that later.
These bad boys are as cool as it gets. Baldwin Locomotive Works started building these beasts back in 1945, to 3 different railroads. On the Pennsylvania they were mostly run in semi-permanent A-A pairs. Resulting in a combined feather light 1.2 million pounds (600 tons), and a hearty 6000hp per pair. These guys were built to haul mass, and the N scale ones do well, in keeping that linage going.

I should get a 4 track signal bridge

First things first though. Paint! Its nice! what more can I say that hasn't been said about nearly any other modern N scale engine. the lines are crisp, wording is legible and the Brunswick Green glistens in the florescent layout lighting like an emerald covered in sharpie ink.
Inside, you have a standard 5-pole motor with 2 hefty flywheels(that work surprisingly well), your DCC board is rear mounted and each unit has 1 lovely speaker in nice little housings that allow it to produce some robust N scale grumble. The chassis is a heavy hunk of cast steel and is not split like some other engines. Lighting is obviously LED and is a nice warm white. Most Broadway Limited engines have dual mode decoders, so for those of you who have no DCC, you can run them on your layout. Just be warned that you will not have access to all the functions. Only the diesel engine and idle sounds. No horn, no bell, no cow and pig loading sounds. 

                                               A unit (back)                                       also A unit (front)


 Even though both engines are technically A units and can be run as 2 separate locos (which I do a lot), they are, specifically the ones Broadway Limited sells in pairs, set up in an A-B fashion. all this basically means is the the front unit, runs all regular like, where as the rear "A" unit is actually set up to run in reverse. So in DCC for the rear unit, reverse is forward and forward is reverse. This is slightly more annoying in DC mode as if you get it wrong you may have to pick up the damn things and physically switch em around.

 the draw-bar is on the left, wheels are in the baggie

Inside the box you get 4 extra little driver sets with traction tires. you have to fiddle with the trucks to install them but as long as you take it slow and follow the directions BLI has on their website its a piece of cake. I only used 2 of them, the engines together pull more cars than I own, and are fairly beefy without them.
You also get a little draw bar in the box along with a pair of micro-trains couplers. The draw-bar permanently couples the engines together, which is arguably best if you plan to keep then planted on your layout and double head them(as per the prototype). It screws into the coupler pocket just like the MT knuckles do. Though, kind of annoying for me, was that no screws are provided, and I don't have any just laying around so I had to improvise with some watch screws. so heads up there.

 There's a reason its called a centipede

As for pick up? Its great, you got 16 wheels picking up juice, so there should be no problems in that regard. That is however if you get a set of second run centipedes. when I first received my set, they ran, well...awful. pick up was trash, stalling every few inches, maybe I would get a foot or 2 if I was lucky. It was incredibly frustrating. especially because I dropped a pretty penny on them, and I felt like I just blew a nice wad of cash. I'm not very good with electronics, and I was kinda scared I would make what ever the problem was worse. So since they were under warranty I gave BLI a call and sent em' back. Turns out that the production run I just so happen to have bought was for some odd reason greased up with non conductive lube, and was the source of all that stalling. But! after a 3 week wait, they came back and run like champs. I wouldn't expect this problem with every unit, but its a minor one and easy to fix. But just be wary of that when you buy.
Oh, and for those of you who run code 55 track, have fun regauging  all 24 of those wheels!

A N5 caboose and a centipede. what else do you need?

All in all, despite all that hoopla with the lube, these are good engines and run(and sound) just as nice as they look. They pull like mule/s and definitely turn heads where ever they run. They come in Southern, Mexican, UP(fantasy) and Pennsy paint jobs, but I'm sure many people will find an excuse to buy at least one, there just too cool not too!

Sunday, May 7, 2017

DCC, Lights, and cars

 Not too exciting of an update really. No major progress has been done scenically to the layout, but I have acquired some neat new toys.
The biggest of which is an NCE powercab DCC system. I have yet to permanently hook it up to the trackwork, but ultimately I would like to be able to switch between DCC and DC so I can run all my dumb junk in circles for hours! I've been slowly getting more DCC equipped stuff so having a way to run it other than at the club is really nice. I have it a ramshackle set up for now, but I'm having a lot of fun with this thing.
one remote to control them all...

Aside from that I mentioned last post I had put lights in the ship but didn't have any pictures to prove it, so there ya go! Sure does look cool. I cant wait till I have more buildings and scenery in place!

the last train of the day, speeds through Southbend before nightfall

 I also got my mits on some really nice resin vehicles with a retro future sci-fi vibe to them.
there 10mm wargamming scenery pieces from the awesome guys at Hawk Wargames. The vehicles are surprisingly detailed, and being 10mm are roughly N scale. putting them next to other "true to scale" cars and trucks they do seem a tad small, but I think that once they are mixed in with other cars and trucks it will be much less noticeable. Paint would also most likely help

 I ended up with 2 bags of cars, 2 bags of trucks and buses, one post-apocalyptic double-decker bus, and one completely unrelated light cruiser class spacecraft. The picture on the right is a comparison with some actual N scale cars. Well, hover cars, I like to mess around but you get the idea.
Got a few more fleet reviews in the works so expect some new stuff up soonish (whenever I stop being lazy).